📺 Retro Programming on the Raspberry Pi Pico 2
Going Bare Metal with C, SPI, and DMA — and Turning the PicoCalc into a Retro Computer
When I started playing with the Raspberry Pi Pico 2, my first thought wasn’t “Let’s run MicroPython.” It was “Can I go bare metal?” — that is, write clean C code, talk to hardware directly, and see pixels or bytes move without an OS, SDK or framework in the way.
That’s exactly what I did. And if you’re into retro programming, the Pico 2 is a fascinating little board to explore this with.
💡 From ZX81 to PicoCalc: 40 Years of Direct Hardware Joy
My journey started with the ZX80 and ZX81 — small, humble machines that forced you to understand every byte you wrote.
There was something magical about typing directly into memory, about owning every part of the system.
For years, I’ve wanted that feeling back — and now, with the PicoCalc, that dream has returned in a portable form factor.
Out of the box, the PicoCalc runs only BASIC or MicroPython, which is fine for quick experiments — but not for me.
My world has always been C and Assembler. I want full control of the hardware: timers, DMA, SPI, and the CPU itself.
That’s where the Raspberry Pi Pico 2 inside the PicoCalc comes into play — a perfect foundation for a personal, portable retro machine.
Over the past months, I’ve already written emulators for the Z80, the Jupiter Ace (a FORTH-based computer from the early ’80s), and even the Vectrex game console.
The PicoCalc is now my perfect platform to continue that journey — and my next step is to integrate a full assembler environment to program games directly on the PicoCalc itself.
Why the Pico 2 Is a Great Retro Platform
The Raspberry Pi Pico 2 uses the RP2350 microcontroller, a dual-core ARM Cortex-M33 running up to 150 MHz with hardware floating-point, USB, SPI, I²C, DMA, and even optional vector processing extensions.
Compared to old 8-bit machines, this is luxurious horsepower — yet the principles are the same:
you write to memory-mapped registers, use bitwise operations to control hardware, and manage timing carefully.
It’s the perfect environment to rediscover the feel of old-school embedded programming — except with modern debugging tools and no EPROM burner in sight.
Getting Started: Going Bare Metal
Before we write any code, let’s define what “bare metal” means here.
In this context, it means:
- No operating system.
- No dynamic memory allocation (unless you implement it).
- Direct access to hardware peripherals.
- Startup code, vector tables, and linker scripts under your control.
You’ll be writing pure C, compiling with arm-none-eabi-gcc, and linking against the Pico SDK — or, if you’re hardcore, even skipping the SDK entirely and writing to registers directly.
On the PicoCalc, this setup is ideal.
The compact form factor and integrated display make it a portable test bench for exploring low-level systems, whether you’re experimenting with DMA transfers or running a tiny virtual CPU of your own design.
Setting Up the Toolchain
To begin, install:
sudo apt install cmake gcc-arm-none-eabi build-essential
Then clone the SDK and set up your environment:
git clone -b master https://github.com/raspberrypi/pico-sdk.git
cd pico-sdk
git submodule update --init
export PICO_SDK_PATH=$PWD
Your CMake project will look like this:
cmake_minimum_required(VERSION 3.13)
include(pico_sdk_import.cmake)

project(pico2_baremetal C CXX ASM)
pico_sdk_init()

add_executable(main
    main.c
)

target_link_libraries(main pico_stdlib)
pico_add_extra_outputs(main)
Build the project:
cmake -Bbuild
cd build
make
Then drag the resulting .uf2 file to your Pico’s USB drive.
Hello, Hardware: Blinking an LED
Let’s start by touching hardware directly. Here’s a minimal example:
#include "pico/stdlib.h"

#define LED_PIN 25

int main() {
    gpio_init(LED_PIN);
    gpio_set_dir(LED_PIN, GPIO_OUT);

    while (true) {
        gpio_put(LED_PIN, 1);
        sleep_ms(200);
        gpio_put(LED_PIN, 0);
        sleep_ms(200);
    }
}
Nothing retro here yet — but it’s a first contact with the hardware. Now, let’s go deeper.
Talking to Peripherals: SPI the Bare-Metal Way
If you’ve ever coded for the C64 or the Atari 800, you know the joy of shifting bytes out to external chips. On the Pico 2, we do the same — only faster.
#include "hardware/spi.h"

void spi_init_example() {
    spi_init(spi0, 1000 * 1000); // 1 MHz
    gpio_set_function(2, GPIO_FUNC_SPI);  // SCK
    gpio_set_function(3, GPIO_FUNC_SPI);  // MOSI
    gpio_set_function(4, GPIO_FUNC_SPI);  // MISO
    gpio_set_function(5, GPIO_FUNC_SIO);  // CS (manual)

    uint8_t data = 0x55;
    gpio_put(5, 0);
    spi_write_blocking(spi0, &data, 1);
    gpio_put(5, 1);
}
This is where things start to feel like retro coding again. You’re sending bytes to a device manually — no abstraction layers, just raw control.
Using DMA to Move Data Like a Pro
The RP2350 includes DMA (Direct Memory Access) controllers that can move data between memory and peripherals without CPU intervention. This is a huge deal if you want to simulate old-school graphics or sound routines.
Here’s a simple example that sends a buffer over SPI using DMA:
#include "hardware/dma.h"
#include "hardware/spi.h"

void dma_spi_transfer(uint8_t *buffer, size_t length) {
    spi_init(spi0, 10000000);
    gpio_set_function(2, GPIO_FUNC_SPI);
    gpio_set_function(3, GPIO_FUNC_SPI);
    gpio_set_function(4, GPIO_FUNC_SPI);
    gpio_put(5, 1);
    gpio_init(5);
    gpio_set_dir(5, GPIO_OUT);

    int dma_chan = dma_claim_unused_channel(true);
    dma_channel_config c = dma_channel_get_default_config(dma_chan);
    channel_config_set_transfer_data_size(&c, DMA_SIZE_8);
    channel_config_set_dreq(&c, spi_get_dreq(spi0, true));

    dma_channel_configure(
        dma_chan,
        &c,
        &spi_get_hw(spi0)->dr, // destination: SPI data register
        buffer,                // source: memory buffer
        length,                // number of bytes
        true                   // start immediately
    );

    // Wait for transfer to finish
    dma_channel_wait_for_finish_blocking(dma_chan);
}
Imagine using this to push bytes to a display controller, DAC, or custom retro hardware circuit. That’s how you recreate the feel of a classic console — but with modern speed.
Beyond the SDK: True Bare Metal
If you want to go even lower, you can skip the SDK entirely. That means:
- Writing your own
crt0.Sstartup code - Setting up the vector table manually
- Controlling the system clock and PLLs
- Writing directly to memory-mapped registers
Here’s how you can toggle a GPIO pin without the SDK:
#define SIO_BASE 0xd0000000
#define GPIO_OUT *(volatile uint32_t *)(SIO_BASE + 0x10)

int main() {
    // Set pin 25 as output (SDK would usually do this for you)
    *(volatile uint32_t *)(0x40014000 + 0x04) = (1 << 25); // GPIO OE
    while (1) {
        GPIO_OUT ^= (1 << 25);
        for (volatile int i = 0; i < 1000000; i++);
    }
}
This is where you feel true bare-metal control. It’s primitive, direct, and incredibly satisfying — like poking registers on an old 6502 system.
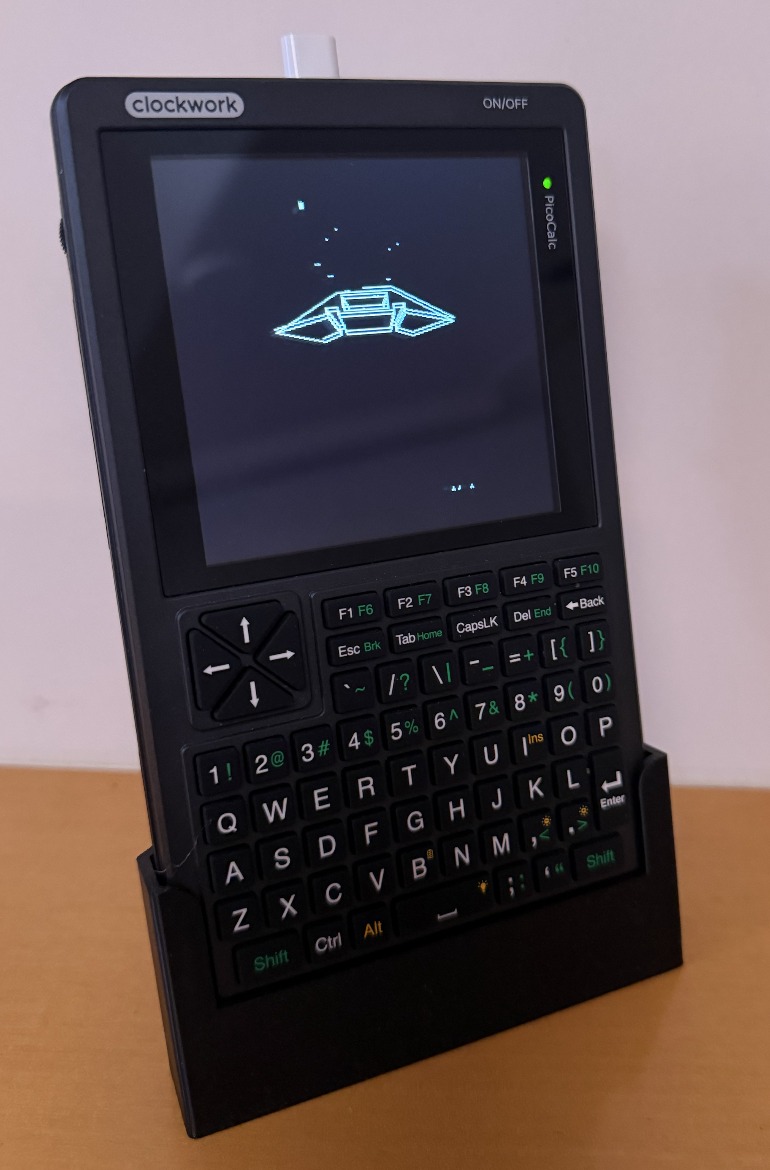
The PicoCalc: A Handheld Retro Playground
Here’s where everything comes together. The PicoCalc is my modern-day equivalent of a pocket computer — small, battery-powered, with a screen and buttons, and powered by the same Pico 2.
I’ve already ported my Z80, Jupiter Ace, and Vectrex emulators to it. Running these on such a tiny, self-contained device feels magical — like holding a collection of classic computers in your hand.
But what truly excites me is what’s coming next: integrating a complete assembler and development environment directly on the PicoCalc.
Imagine being able to:
- Type assembly code directly on the device
- Assemble it locally
- Run it instantly in an emulator
- Save and load projects to flash storage
That’s a true retro workflow, entirely self-hosted — no PC, no external tools, just pure programming on the machine itself. It’s what we used to do with the ZX80 and ZX81 — and now, decades later, I finally have that feeling again.
Why Retro Programmers Will Love It
Working this close to the metal brings back that lost intimacy with the machine. You own every byte and every clock cycle.
It’s not about writing applications — it’s about understanding the hardware. Whether you’re generating sound waves, driving a display, or emulating a vintage computer, the Pico 2 (and by extension, the PicoCalc) gives you that instant-feedback, low-level experience that modern platforms abstract away.
What’s Next
In my next post, I’ll show how to:
- Build a (simple) frame buffer for SPI displays
- Use DMA and interrupts to simulate old-style video timing
- Integrate my assembler into the PicoCalc runtime
- Port classic emulator and games directly to it
Because once you’ve gone bare metal… there’s no going back ;)
Emulator Projects
-
Vectrex Emulator (WIP): Emulates the Motorola 6809 CPU and the vector-based display logic. Using DMA and hardware timers, the Pico 2 can render smooth line graphics — a remarkable achievement for a microcontroller.
-
Z80 Emulator: A fast and cycle-accurate core designed for multiple classic systems. Used as the base for my Jupiter Ace emulator. More to come …
-
Jupiter Ace Emulator: Faithfully reproduces the quirky FORTH-based machine. On the PicoCalc, it runs smoothly with keyboard input and SPI-based display output.
Future Work
- Integrated assembler and editor directly on the PicoCalc
- Cross-compatibility layer to run multiple retro environments from one menu